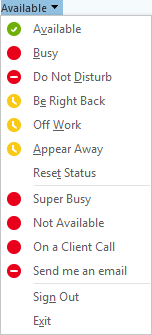
The following will show you how to configure your Microsoft Lync client with up to 4 custom states.
At the time of this writing, this configuration has worked with both the Lync 2013 client and the Skype for Business client on Windows 7 SP1, and Windows 8.1.
[Update] This also works in Skype for Business 2016 on Windows 10. To support Office 2016 installations, the below key path needs to change from 15.0 to 16.0.
The XML File
Create an XML file in your Documents folder called “Lync-Custom-States.xml”. Paste the following content, and edit it as needed. Keep in mind that there is a limit of 4 IDs. Creating more than 4 will not work.
<?xml version="1.0"?>
<customStates xmlns="http://schemas.microsoft.com/09/2009/communicator/customStates">
  <customState availability="Busy" ID="1">
    <activity LCID="1033">Super Busy</activity>
  </customState>
  <customState availability="Busy" ID="2">
    <activity LCID="1033">Not Available</activity>
  </customState>
  <customState availability="Busy" ID="3">
    <activity LCID="1033">On a Client Call</activity>
  </customState>
  <customState availability="Do-Not-Disturb" ID="4">
    <activity LCID="1033">Send me an email</activity>
  </customState>
</customStates>
The Registry Changes
Open Regedit and create the following Key path:
HKEY_LOCAL_MACHINE\SOFTWARE\Policies\Microsoft\Office\15.0\Lync
Inside the “Lync” key, create the following:
New:   DWORD (32-bit) Value
Name:  EnableSIPHighSecurityMode
Data:  0
-and-
New:   String Value
Name:  CustomStateURL
Data:  file:///<PathToXMLfile>
Example:

Restart the Lync Client
After restarting the Lync client, you’ll see the new options for your status.
