Update [06-Feb-2018]: Initially, this post was written to show how a single certificate could be used for all ConfigMgr Clients on workgroup computers. But, based on further testing (thanks Bill), it turns out you cannot use a single certificate for ConfigMgr Clients on workgroup computers.
I’m assuming this is because the ConfigMgr client uses a certificate’s thumbprint to associate the computer with a Resource ID in the ConfigMgr database. Therefore, the workgroup computers using the same certificate (the same thumbprint) will overwrite each other’s information when they report in.
Because of this, I have rewritten this post to give some guidance on using a unique certificate for each workgroup computer.
Certificates and the ConfigMgr Client
Currently, you have to use a unique certificate for each workgroup computer. Here are some things to keep in mind:
- If the Common Name (CN) property in the certificate’s Subject is the same as the computer’s hostname, when Ccmsetup.exe is run, it will automatically find and use that certificate.
- The CN property of each certificate’s Subject does not need to match up with the computer’s hostname.
- If the CN in the certificate does not match the hostname of the workgroup computer, Ccmsetup.exe requires a custom property to tell the installer which certificate to use.
Certificate Requirements
The ConfigMgr Client certificate requirements for workgroup computers are basically the same as an internal HTTPS deployment for domain-joined clients.
When creating the Certificate Template:
- Duplicate the Workstation Authentication template with Windows Server 2003 and Windows XP compatibility.
- On the Security tab, remove Domain Computers, and then add the computer account that will be used to request the certificates, and give it Enroll permissions.
- The template only needs to have the Client Authentication EKU (Application Policy).
- Allow the private key to be exported (.PFX file).
- The Subject Name is supplied in the request, not built from Active Directory information.
- Do not publish the certificate in Active Directory.
Requesting One or More Certificates
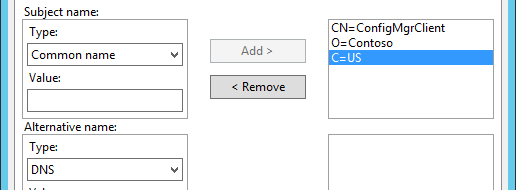
- A Common Name (CN) is included in the Subject Name of the certificate.
- The value of the Common Name (CN) is the hostname of the workgroup computer, or a name that identifies the purpose of the certificate. For example: CN=ConfigMgrClient
- Subject Alternate Name (SAN) DNS entries are not needed, but they can be included.

If you added a computer account to the certificate template’s security tab that’s running Win 10 or Server 2016, here’s a PowerShell script to generate a bunch of certificates and export each of them to a .PFX file.
## Define the Cert template, number of certs to generate, and the PFX file password.
$TemplateName  = "Contoso-ConfigMgrClient-Custom"
$NumberOfCerts = 10
$PfxPwd        = ConvertTo-SecureString -String "Password" -Force -AsPlainText

$i = 1

While ($i -le $NumberOfCerts) {

    ## Convert the integer to a string with leading zeros
    $CertNum = $i.ToString("0000")

    ## Request the cert and store it in a variable
    $Cert = Get-Certificate -Template $TemplateName `
                            -SubjectName "CN=ConfigMgrClient$($CertNum),C=US" `
                            -DnsName "configmgrclient$($CertNum).contoso.com" `
                            -url ldap: `
                            -CertStoreLocation cert:\LocalMachine\My

    ## Add the cert's thumbprint to a variable
    $Thumbprint = $Cert.Certificate.Thumbprint

    ## Using the cert's thumbprint, export it as a PFX with the password
    Export-PfxCertificate -Cert cert:\localmachine\my\$Thumbprint `
                          -FilePath "C:\Certs\ConfigMgrClient$($CertNum).pfx" `
                          -ChainOption EndEntityCertOnly `
                          -Password $PfxPwd

    ## Increment 1
    $i++

}
Installing a Certificate
When installing a certificate on a Windows workgroup computer:
- The certificate’s private key needs to be included (.PFX file).
- The certificate is installed into the local computer’s Personal container.
- All certificates in the chain are required (Root and any Intermediate certificates).
- A Root certificate should go into the workgroup computer’s Trusted Root Certification Authorities container.
- All Intermediate certificates should go into the workgroup computer’s Intermediate Certification Authorities container.
If the workgroup computers are running Windows 8.1 or newer, you can use PowerShell to import the PFX file.
Import-PfxCertificate -FilePath "C:\Path\to\ConfigMgr-Workgroup-Cert.pfx" -CertStoreLocation Cert:\LocalMachine\My -Password (ConvertTo-SecureString -AsPlainText 'Password' -Force)
Here are the PowerShell commands to import the Root & Intermediate certificates.
Import-Certificate -FilePath "C:\Path\to\RootCertFile.cer" -CertStoreLocation Cert:\LocalMachine\Root

Import-Certificate -FilePath "C:\Path\to\IntermediateCertFile.cer" -CertStoreLocation Cert:\LocalMachine\CA
Installing the ConfigMgr Client
Normally, the ConfigMgr Client will select a certificate that matches the computer’s hostname. If you have a certificate that does not match the hostname, you have to tell the installer which certificate to use. This is done with the CCMCERTSEL property, and the value of this property will be used as a search string.
Here’s an example installation command for an Internet Only client:
CCMSetup.exe /UsePKICert /NoCRLCheck /Retry:1 /MP:https://ibcm.contoso.com CCMCERTSEL="SubjectStr:ConfigMgrClient" CCMFIRSTCERT=1 CCMALWAYSINF=1 SMSSITECODE=PS1 CCMHOSTNAME=ibcm.contoso.com
Note that the CCMCERTSEL property is searching the Subject of the certificate for a string that contains ConfigMgrClient, which is the value of the Common Name (CN) in my example above. Keep in mind that you could do a search for anything in the Subject of a certificate. For example, if the certificate’s Subject contained an Organization (O=Contoso), you could search for “Contoso” instead.
The CCMFIRSTCERT property tells the ConfigMgr Client to choose the certificate with the longest validity period. This will occur during installation, and each time the ConfigMgr Client checks its location. The location check process is logged in ClientLocation.log.
All ConfigMgr Client installation properties can be found here: https://technet.microsoft.com/en-us/library/gg699356.aspx
Updating the Certificate
Based on my testing, if the ConfigMgr Client is installed without the CCMFIRSTCERT property set to 1 (one), it won’t try to use a new certificate until its current certificate has expired. Additionally, the ConfigMgr Client won’t automatically scan for a new certificate when the old one expires. You will have to restart the SMS Agent Host service to trigger the scan.
Therefore, make sure you include the CCMFIRSTCERT property when you run CCMSetup.exe. Otherwise, when you deploy a new certificate, you will need to delete the old certificate, and restart the SMS Agent Host service.
Test Environment
My test environment included:
- A Primary Site server and an IBCM server running Configuration Manager 1706 with Hotfix Rollup (KB4042949) on Windows Server 2012 R2.
- The ConfigMgr Client was v5.00.8540.1611 installed on Windows 10 (1703).