When developing an update plan for Office 365 click-to-run products, part of the process is deciding where the Office applications will source their updates. For smaller organizations, using Microsoft’s Content Delivery Network (CDN) works just fine. For larger organizations, which have offices holding thousands of computers, it’s better to use an internal source.
An internal source could be a patch management program like System Center Configuration Manager (SCCM), a UNC path to one or more file shares, or better yet, an HTTP location using a web server (IIS, Apache, NGINX, Lighttpd, etc.).
Why Use a Website?
The most common, and readily documented, option for an update source is a UNC path to a file share. However, there may be business reasons to deploy a website instead:
- You have external devices that rarely, or never, connect to your internal networks, and you don’t want those devices to use Microsoft’s CDN. Instead, you want to control when and which updates are installed.
- You don’t have a patch management application that can update Office click-to-run products, or the application cannot be used for external devices.
- You want to allow machines from multiple domains, forests, and workgroups to update without needing to consider access permissions.
- You need to give another team the ability to control the update process without having to give them special permissions in the domain/forest.
Regardless of the business reasons, deploying a website for Office click-to-run products to source their updates is fairly straightforward.
Deploying a Website
I tested deploying a website using Apache HTTP Server on Ubuntu 16.04 LTS, and everything worked out of the box. All I did was create a directory in /var/www/html, and then copied an Office build into that directory. The Office clients updated without any errors or issues.
However, using IIS on Windows Server 2012 R2 did not work out of the box, and because of this, I’m going to cover the deployment steps.
IIS Deployment Example
This example has the following steps:
- Create a directory structure using PowerShell
- Install IIS using PowerShell
- Create an IIS Virtual Directory using PowerShell
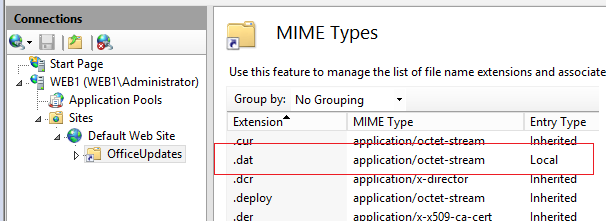
- Add the .dat Mime Type to IIS (IIS Manager or web.config file)
- Create an index.html file so the status of the website can be checked
Create the Directory Structure
Use PowerShell to create two directory structures. One to stage the downloaded builds, and another that contains the build currently available to the Office clients:
- A pilot group for testing
- A production group for everyone else
Note: Your structure and folder names will vary depending on your environment and the Office builds you’re downloading (Insiders, Monthly, Targeted, or Broad).
$TopDirSite = 'D:\OfficeUpdates'
$TopDirBuilds = 'D:\OfficeBuilds'

## Directories for the Website
New-Item -ItemType Directory -Path "$TopDirSite\Prod-DC"
New-Item -ItemType Directory -Path "$TopDirSite\Pilot-DC"

## Directories for Staged Office Builds
New-Item -ItemType Directory -Path "$TopDirBuilds\Prod-DC"
New-Item -ItemType Directory -Path "$TopDirBuilds\Pilot-DC"
Install IIS on Server 2012 R2
Use PowerShell to install IIS on Server 2012 R2:
Install-WindowsFeature Web-Server -IncludeManagementTools
Configure the IIS Virtual Directory
Use PowerShell to create a virtual directory in the Default Web Site pointing to the “OfficeUpdates” directory tree:
## Virtual Directory Properties

$vDirProperties = @{

    Site         = "Default Web Site"
    Name         = "OfficeUpdates"
    PhysicalPath = 'D:\OfficeUpdates'

}

New-WebVirtualDirectory @vDirProperties
Add the .DAT Mime Type Using IIS Manager
- Open IIS Manager
- Browse the tree and select your virtual directory
- Double-click MIME Types in the middle panel
- In the Actions panel (on the right), click Add
- File Name Extension: .dat
- MIME Type: application/octet-stream

Add the .DAT Mime Type Using a web.config File
If your IIS server is running Server 2012 R2 Core, create a text file called web.config, and add the below text:
File Name: web.config
Location: D:\OfficeUpdates
<?xml version="1.0" encoding="UTF-8"?>
<configuration>
  <system.webServer>
    <staticContent>
      <mimeMap fileExtension=".dat" mimeType="application/octet-stream" />
    </staticContent>
  </system.webServer>
</configuration>
Create an Index File for Monitoring the Site’s Status
File Name: index.html
Location: D:\OfficeUpdates
<!DOCTYPE html PUBLIC "-//W3C//DTD XHTML 1.0 Strict//EN" "http://www.w3.org/TR/xhtml1/DTD/xhtml1-strict.dtd">
<html xmlns="http://www.w3.org/1999/xhtml">
  <head>
    <meta http-equiv="Content-Type" content="text/html; charset=iso-8859-1" />
    <title>Office Update Site</title>
  </head>
  <body>
    <h1>The Office Update Site is UP!</h1>
  </body>
</html>
Additional Info and Thoughts
Consider adding a second disk to your web server for the Office 365 click-to-run builds. Depending on the number of languages you include, each build could be in excess of 1.5 GB.
During my testing, I found that using an SSL certificate for the website does work. However, keep in mind that Microsoft has not documented this as a supported scenario. If you have a requirement to use SSL, plan and test accordingly.
When deploying a web server that will accept connections from the Internet, consider using a VM in Microsoft Azure or Amazon Web Services, and follow best practices for hardening the server OS and the web server application. Additionally, consider using a hostname that is not easily guessed. Something with random numbers and letters.